Let's talk once again about machine embroidery designs and their editing, especially about changing the machine embroidery design size within the machine embroidery program. If you are the one who creates own machine embroidery designs, then you should close this article and find something more useful for your self-development. Our efforts are concentrated towards those people who use ready-made machine embroidery designs.
So, you are the beginner on this path and everything you do is embroidering ready-made designs created by your up-beats, forum friends or simply downloaded from the Internet etc..
YOU HAVEN`T CREATED THIS MACHINE EMBROIDERY DESIGN YOURSELF IN THE SOFTWARE.
Have you ever had an idea of changing the size of the embroidery design so that it fits your hoop while embroidering ready-made machine embroidery designs? Were there such cases when you like the design but embroidery machine does not see it?
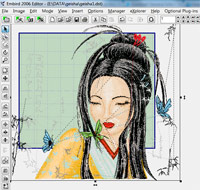 |
| Pattern exceeds the size of the hoop! |
Perhaps it is necessary to alter its size and then embroider?
It seems that there is nothing easier than select the embroidery design, pull the black corner handle, altering the size upward or downward, and then save changes.
But there are limits:
Note: YOU CAN CHANGE PATTERN SIZE FOR NOT MORE THAN 5-10% UPWARD OR DOWNWARD WITHOUT THE CONVERSION OF THE STITCHES. AFTER THESE CHANGES YOU HAVE TO CHECK IF THERE ARE ANY TOO LONG OR SHORT STITCHES.
Exceptions to this rule are machine embroidery designs that were created by someone who conveyed them in their native format and clearly pointed out what machine embroidery software were used.
For those who are just starting to embroider such phrase as "recoun the stitches," as well as the concepts of "too long" and "too short" stitches and the "native format" will probably be unclear, so now we will analyze everything in detail.
To start with, you should remember that "native format" means the file created in a particular program, such as Compucon EOS or Wilcom, and saved in a special embroidery format for further editing. Every machine embroidery software has its format. If you open a design made in the Wilcom program and saved in its native EMB format, it does not mean that the machine embroidery design can be changed. The machine embroidery design must be created and initially saved in the EMB format but not converted to it!
Now, let’s talk about altering the size...
So, there are two ways to change the size of the machine embroidery designs with the help of editing machine embroidery software:
1. With recount of the stitches
2. Without recount of the stitches
RESIZING THE PATTERN WITHOUT RECOUNT OF THE STITCHES
As mentioned above, you can change embroidery design size for not more than 5-10% upward or downward without the recoun of the stitches, and then check if there are any too long or short stitches. Let me explain...
Imagine that your machine embroidery design has short stitches (and it is definitely has), sized 1 mm. You reduce the size of the embroidery design for 20%, and respectively the stitch which was 1 mm long decreases its size along with the entire pattern for 20%. And if you have thousand of such stitches or even more? You’ll get little dense embroidery with a huge range of short stitches. Don’t you want to torture the embroidery machine?
Now we will consider the opposite situation, when you increase the size of the pattern for 20% having long stitches there sized 6mm. Of course, they will increase in size along with the whole design. You get long stitches that will sag because 6-7 mm stitch is considered to have critical length.
Change the size, but watch out for the stitches!
RESIZING THE PATTERN WITH RECOUNT OF THE STITCHES
Dear beginners! Now I’d like to present here my personal point of view:
ALTERING MACHINE EMBROIDERY DESIGN WITH CONVERSION OF THE STITCHES IS QUITE THANKLESS AND USELESS JOB, ESPECIALLY IF THIS EMBROIDERY DESIGN HAS PICTURESQUE STITCH COLOR FILL OR COMPLICATED STITCH EFFECTS.
In other words, if you want to alter the size of the machine embroidery design using recount of the stitches, "Simple Ring" machine embroidery design for instance, then you are welcome. But if the changes concern more complicated machine embroidery, then forget about this idea or contact the author of the embroidery design with a request to change its size.
What happens to the machine embroidery design after changing its size with recount of the stitches? The answer is quite simple: the software automatically tries to reproduce beautiful fill stitch (programmed, carved) designed by the author of the machine embroidery design. As a rule, the embroidery software fails to fulfill this task and as a result you will get a set of stitches and a flat lump instead of the beautiful embroidery... Do you need it?
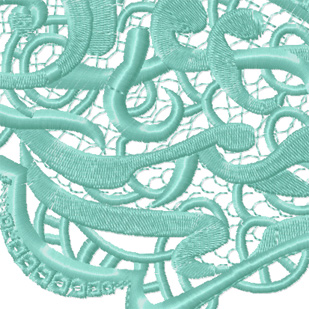
In the picture below you can see a machine embroidery design in its original version, and then after changing its size with recount of the stitches. Warning attention to the changes of the fill stitch in some areas – satin stitch has turned into tatami. The embroidery program has changed the fill stitch on the most embroidery design objects at its discretion and without corresponding to reality. If the author of the embroidery design has provided not dense fill stitches in this very area while the embroidery software sets its own parameters, then you`ll get tightened material and ugly embroidery.
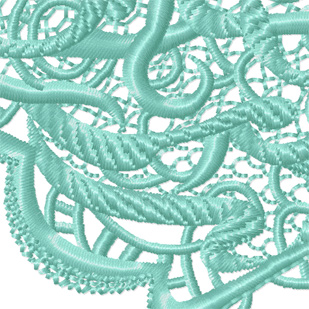 |
| Machine Embroidery design original |
 |
|
Original Machine embroidery pattern after changing
its size with conversion of the stitches. |
An example of changing complex color fill formed by the needle puncture. You must admit that the difference in the embroidery will be appreciable. Imagine that the whole fascinating embroidery design has turned into a simple set of primitive objects. Beautiful artistic machine embroidery design has turned into a set primitive tatami objects.
 Instant Download


